Radio Sticks Getting Started Guide
This guide covers the shared setup flow for the zzh Stick, zzhp Stick and zzhp-lite Stick.

1. Connect the stick
Plug the stick into the host and confirm that a serial port appears before doing anything with firmware.
- Linux: inspect
dmesgand/dev/serial/by-id/. - Windows: look under Ports (COM & LPT) in Device Manager.
- macOS: compare
ls /dev/tty.*before and after connecting the stick.
zzh uses a CH340 USB-to-serial bridge. zzhp-family revisions use a bridge that also exposes the modem-control lines used for Auto-BSL. Current operating systems normally install the required driver automatically.
New boards run a small LED blink test. This confirms that the hardware is alive; it is not Zigbee coordinator firmware.
2. Choose firmware
Use the compiled images in the Koenkk Z-Stack firmware repository. Its tested-adapter table is the source of truth for the target mapping.
| Board | Coordinator firmware | Router firmware |
|---|---|---|
| zzh | CC2652R_coordinator_*.zip | CC2652R_router_*.zip |
| zzhp / zzhp-lite | CC1352P2_CC2652P_other_coordinator_*.zip | CC1352P2_CC2652P_other_router_*.zip |
Choose coordinator firmware when the stick will be used by Zigbee2MQTT, Home Assistant ZHA or another TI ZNP application. Choose router firmware only for a stand-alone device that will join and extend an existing Zigbee network.
Firmware for the wrong target can change the bootloader pin configuration and make the BSL button stop working. Recovery then requires an external cJTAG/JTAG debugger.
3. Enter the ROM bootloader
For zzh, or as the manual fallback on zzhp:
- Unplug the stick.
- Press and hold BSL.
- Plug the stick into the host while holding the button.
- Wait a few seconds, then release it.
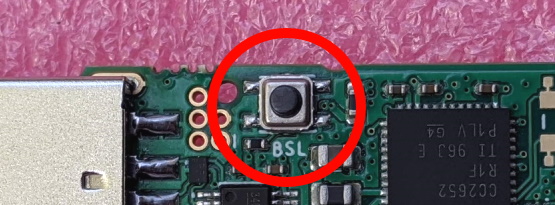
If the factory blink test is still installed, the LED stops blinking while the ROM bootloader is active. zzhp hardware can also enter BSL through DTR/RTS when the flashing tool supports its Auto-BSL sequence.
4. Flash the image
Unzip the selected archive to obtain the .hex image. Two established flashing paths are available.
cc2538-bsl
cc2538-bsl is cross-platform. Install it from a checkout:
git clone https://github.com/JelmerT/cc2538-bsl.git
cd cc2538-bsl
python -m pip install .
With the board in BSL mode and every Zigbee application stopped:
cc2538-bsl -p PORT -e -w -v FIRMWARE.hex
Use the stable /dev/serial/by-id/... path on Linux when possible, or the appropriate COM port on Windows.
TI SmartRF Flash Programmer 2
SmartRF Flash Programmer 2 provides a Windows GUI.
- Select the stick's COM port.

- Select CC2652R for zzh or CC2652P for zzhp.

- Choose the unzipped
.hexfile. - Enable Erase, Program and Verify, then start the operation.
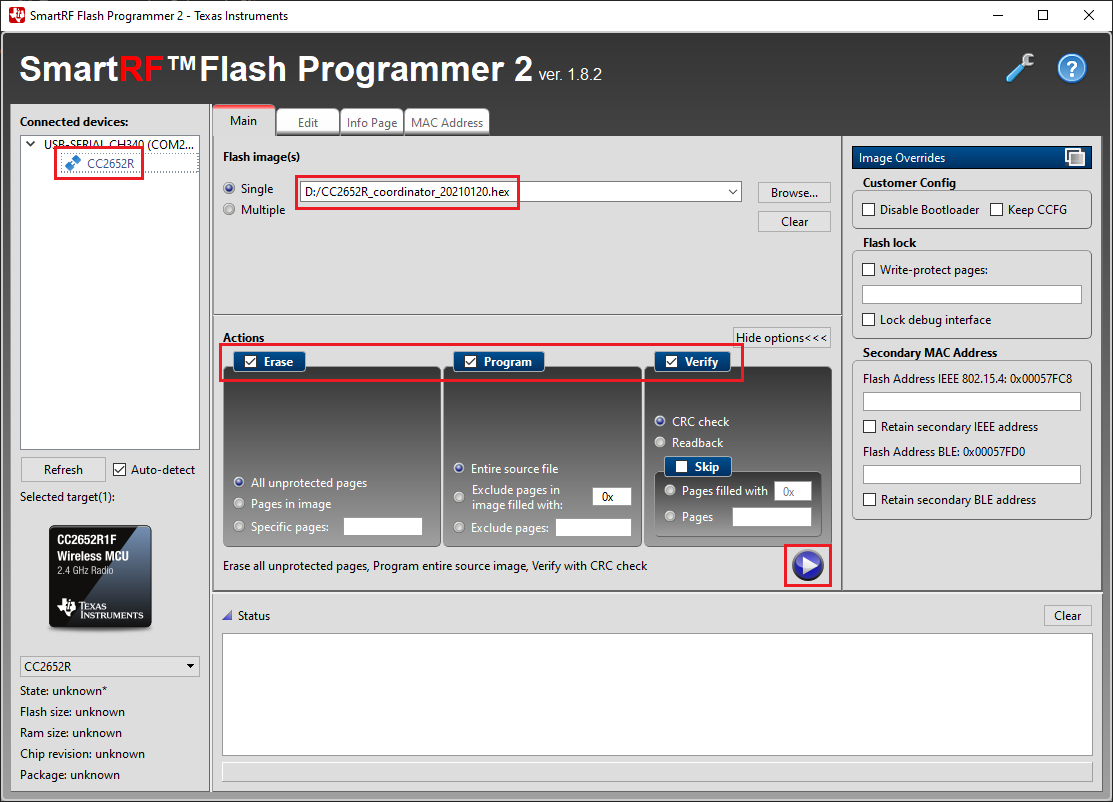
A successful operation finishes with every page verified and the target reset:

5. Configure the host application
Reconnect the stick normally and continue with Home Automation Setup. If flashing or serial communication fails, use TI CC Series Radios Troubleshooting.